Blueprint AI Version 4.0.0 - Documentation
Release Notes, Setup & Usage
Abstract
This document describes the install and configuration steps of the Blueprint AI scoped application installed from the ServiceNow Store.
Document History
Introduction
Welcome to the user guide for installing and configuring Blueprint AI on your ServiceNow instance. Blueprint AI is an advanced artificial intelligence (AI) application designed to enhance and streamline your ServiceNow Software Development Life Cycle (SDLC) processes and workflows, providing powerful insights and automation capabilities.
This guide is intended for ServiceNow administrators and will walk you through the necessary steps to successfully deploy and configure Blueprint AI. By following this guide, you will learn how to set up both production and development instances, configure essential system properties, activate relevant ServiceNow products, and customize various components to fit your organization’s needs.
Whether you are setting up Blueprint AI for the first time or optimizing your existing configuration, this guide will provide you with comprehensive instructions and best practices to ensure a smooth and efficient implementation.
1.1 Overview of Blueprint AI
Blueprint AI is a cutting-edge ServiceNow application designed to help platform owners and administrators streamline their Software Development Lifecycle (SDLC) process and automate many of the steps along the way using artificial intelligence. This powerful tool leverages AI to enhance efficiency, accuracy, and productivity, making it an invaluable asset for managing and optimizing your ServiceNow environment.
The key features of this release are designed to significantly improve your workflow. First, Blueprint AI simplifies the process of gathering and managing business requirements through streamlined data intake mechanisms, such as forms and data imports. It then moves on to automatically generate detailed technical designs, drastically reducing the time and effort required for manual design creation. With its capability for instant solution development, Blueprint AI allows for quicker deployment and iteration, accelerating your development cycle.
Blueprint AI includes several configurable workflow stages associated with the lifecycle of the Blueprint AI record. These stages can be turned on or off as needed, providing the flexibility to adapt to your specific processes and requirements. To further streamline decision-making and development, the application offers platform standards and default settings, known as component overrides, ensuring consistent governance and reducing the potential for errors.
Supporting both production and development instances, Blueprint AI allows organizations to test and refine their configurations in a controlled environment before deploying them to live systems. This dual-instance approach ensures that changes can be thoroughly vetted without disrupting ongoing operations.
Finally, Blueprint AI enhances user interaction through pre-configured chat questions that provide quick responses when interacting directly with the AI. This feature allows users to efficiently communicate with the AI, obtaining the information and support they need without delay.
Overall, Blueprint AI is designed to revolutionize the ServiceNow experience by automating key processes, improving decision-making, and accelerating development, making it an essential tool for modern platform management.
1.2. Installation Prerequisites
1.2.1 Approval for Store Trial or Purchase
Before you can install Blueprint AI, ensure that either a store trial or a purchase has been approved by Blueprint Solutions. This approval is necessary for the application to be available for installation. For purchases, Blueprint Solutions will collaborate with ServiceNow to set up the entitlement.
1.2.2 Acceptance of Store Terms and Conditions
After receiving approval from Blueprint Solutions, you need to agree to the ServiceNow Store terms and conditions. To do this, log into the ServiceNow Store and accept the terms and conditions.
2. Deploying Blueprint AI
Blueprint AI should be installed in your Production instance to ensure that requirement gathering, workflow initiation, and user collaboration occur in the same environment where the application is actively used. Development and testing activities can still be managed using update sets in lower instances (e.g., Development or Test) as needed.
2.1 Installation Steps
2.1.1 Install Application
For more detailed information about these steps, please refer to the ServiceNow Docs article on installing a Store application, or search for “Install a ServiceNow Store application” on the ServiceNow Docs site.
1. Follow these steps in the Production instance.
2. Login as a user with the “admin” role.
3. Navigate to All > System Applications > All Available Applications > All [Figure 1]
Figure 1

4. Search for “Blueprint AI”
5. Select the version you want to install from the dropdown.
Note: The latest version is selected by default.
6. Click the “Install” button
Notes:
• The ServiceNow progress bar may appear to be stuck or remain at the same percentage for several minutes. If this happens, please continue to wait.
• You can choose to “Run in Background” if you prefer to perform other tasks while the installation is in progress.
7. Once the install is finished, click the “Close” button
8. To ensure the application has been installed, refresh the browser and search for “Blueprint AI” in the application navigator. [Figure 2]
Figure 2

2.1.2 Configure Users, Roles, and Groups
Blueprint AI includes distinct roles, each serving a specific purpose within the application. Assign roles based on the user’s function: administrators should receive full access to manage and configure the application, blueprint contributors should be able to create and interact with blueprints, approvers need access to review and approve submissions, and system users require permissions to facilitate instance communication. Assign roles accordingly to ensure the right level of access and functionality for each user.
2.1.2.1 Roles
Assign access through approved groups according to each person's responsibilities. Being a participant on a Blueprint does not replace the roles needed to act on it.
x_blsog_blueprint.self_service - Create Blueprints, define and refine your own business requirements, and monitor progress. Requirements remain editable until submitted for approval; they become read-only while approval is pending.
x_blsog_blueprint.user - Create, update, and fulfill Blueprints through the lifecycle in the portal, workspace, or native UI. Membership in the group assigned to a task is also required to take its actions.
x_blsog_blueprint.approver - Review business requirements, technical designs, peer reviews, system testing, or user acceptance testing when assigned. Also assign the standard ServiceNow approver_user role. Pending approvers review rather than edit; return work to Draft when requirements need revision.
x_blsog_blueprint.admin - Configure Blueprint AI, including products, participants, instances, and application settings. Restrict this role to responsible administrators.
x_blsog_blueprint.api_user is deprecated. Use the release-specific lookup and deployment account configuration in section 2.1.5 instead of assigning this older role to new integrations.
2.1.2.2 Groups
To ensure proper access to Blueprint AI features, at least one group in your instance must be assigned the x_blsog_blueprint.user role. This role grants users the ability to:
-
Access the Blueprint AI module, portal, and workspace
-
Create and manage blueprints
-
Act on tasks generated by the Blueprint AI process
2.1.3 Configure Application Settings
Blueprint AI separates provider and model configuration from the remaining system properties. Configure development and chat independently where your organization uses different endpoints or models.
2.1.3.1 AI Provider and Models
1. Sign in with the administrative access required to configure Blueprint AI and select the Blueprint AI application scope (Figure 3).
2. Open All > Blueprint AI > Administration > Blueprint AI Setup.
3. Select the AI Provider. Enter the approved AI API Key, AI Endpoint, AI Model, and AI Response Mode. Configure the corresponding Chat fields for conversational requests. For Azure OpenAI, also configure the applicable Azure OpenAI API Version fields.
4. Use endpoints, models, response modes, and API versions supported by your installed release and provider deployment. Blueprint AI supports the OpenAI Responses and Completions API paths described in the release manual. Do not reuse sample credentials or assume an old preview API version remains appropriate.
5. Save the configuration. Keep API keys out of screenshots, requirements, support tickets, and public documentation. Validate the connection with a controlled non-production Blueprint before routine use.
2.1.3.2 System Properties
Open All > Blueprint AI > Administration > Properties. Review the settings below, use approved values for your environment, and save. Retain the supplied Flow action-type configuration unless a supported change is required.
The allowed action types setting maps to sys_hub_action_type_definition and limits which supported actions Blueprint AI can use while building Flows. Changing it can affect generated Flow behavior. Keep the shipped value unless your administrator has validated a supported change.
After saving provider settings and properties, continue with products, instance connections, deployment governance, and full setup. A saved API key alone does not complete application setup.
Figure 3 - Select the Blueprint AI application scope.

Figure 4 - Blueprint AI Setup: provider, model, and chat configuration.

2.1.4 Configure Products
Blueprint Products define the supported ServiceNow products, available configuration components, related tables, chat questions, and workflow participants. Activate only products that are relevant and available in your environment. Blueprint support does not install or license the underlying ServiceNow application.
1. Sign in with x_blsog_blueprint.admin, select the Blueprint AI application scope, and open All > Blueprint AI > Administration > Products (Figure 5).
2. Deactivate products your organization does not use. Open each active product and review its components and related tables.
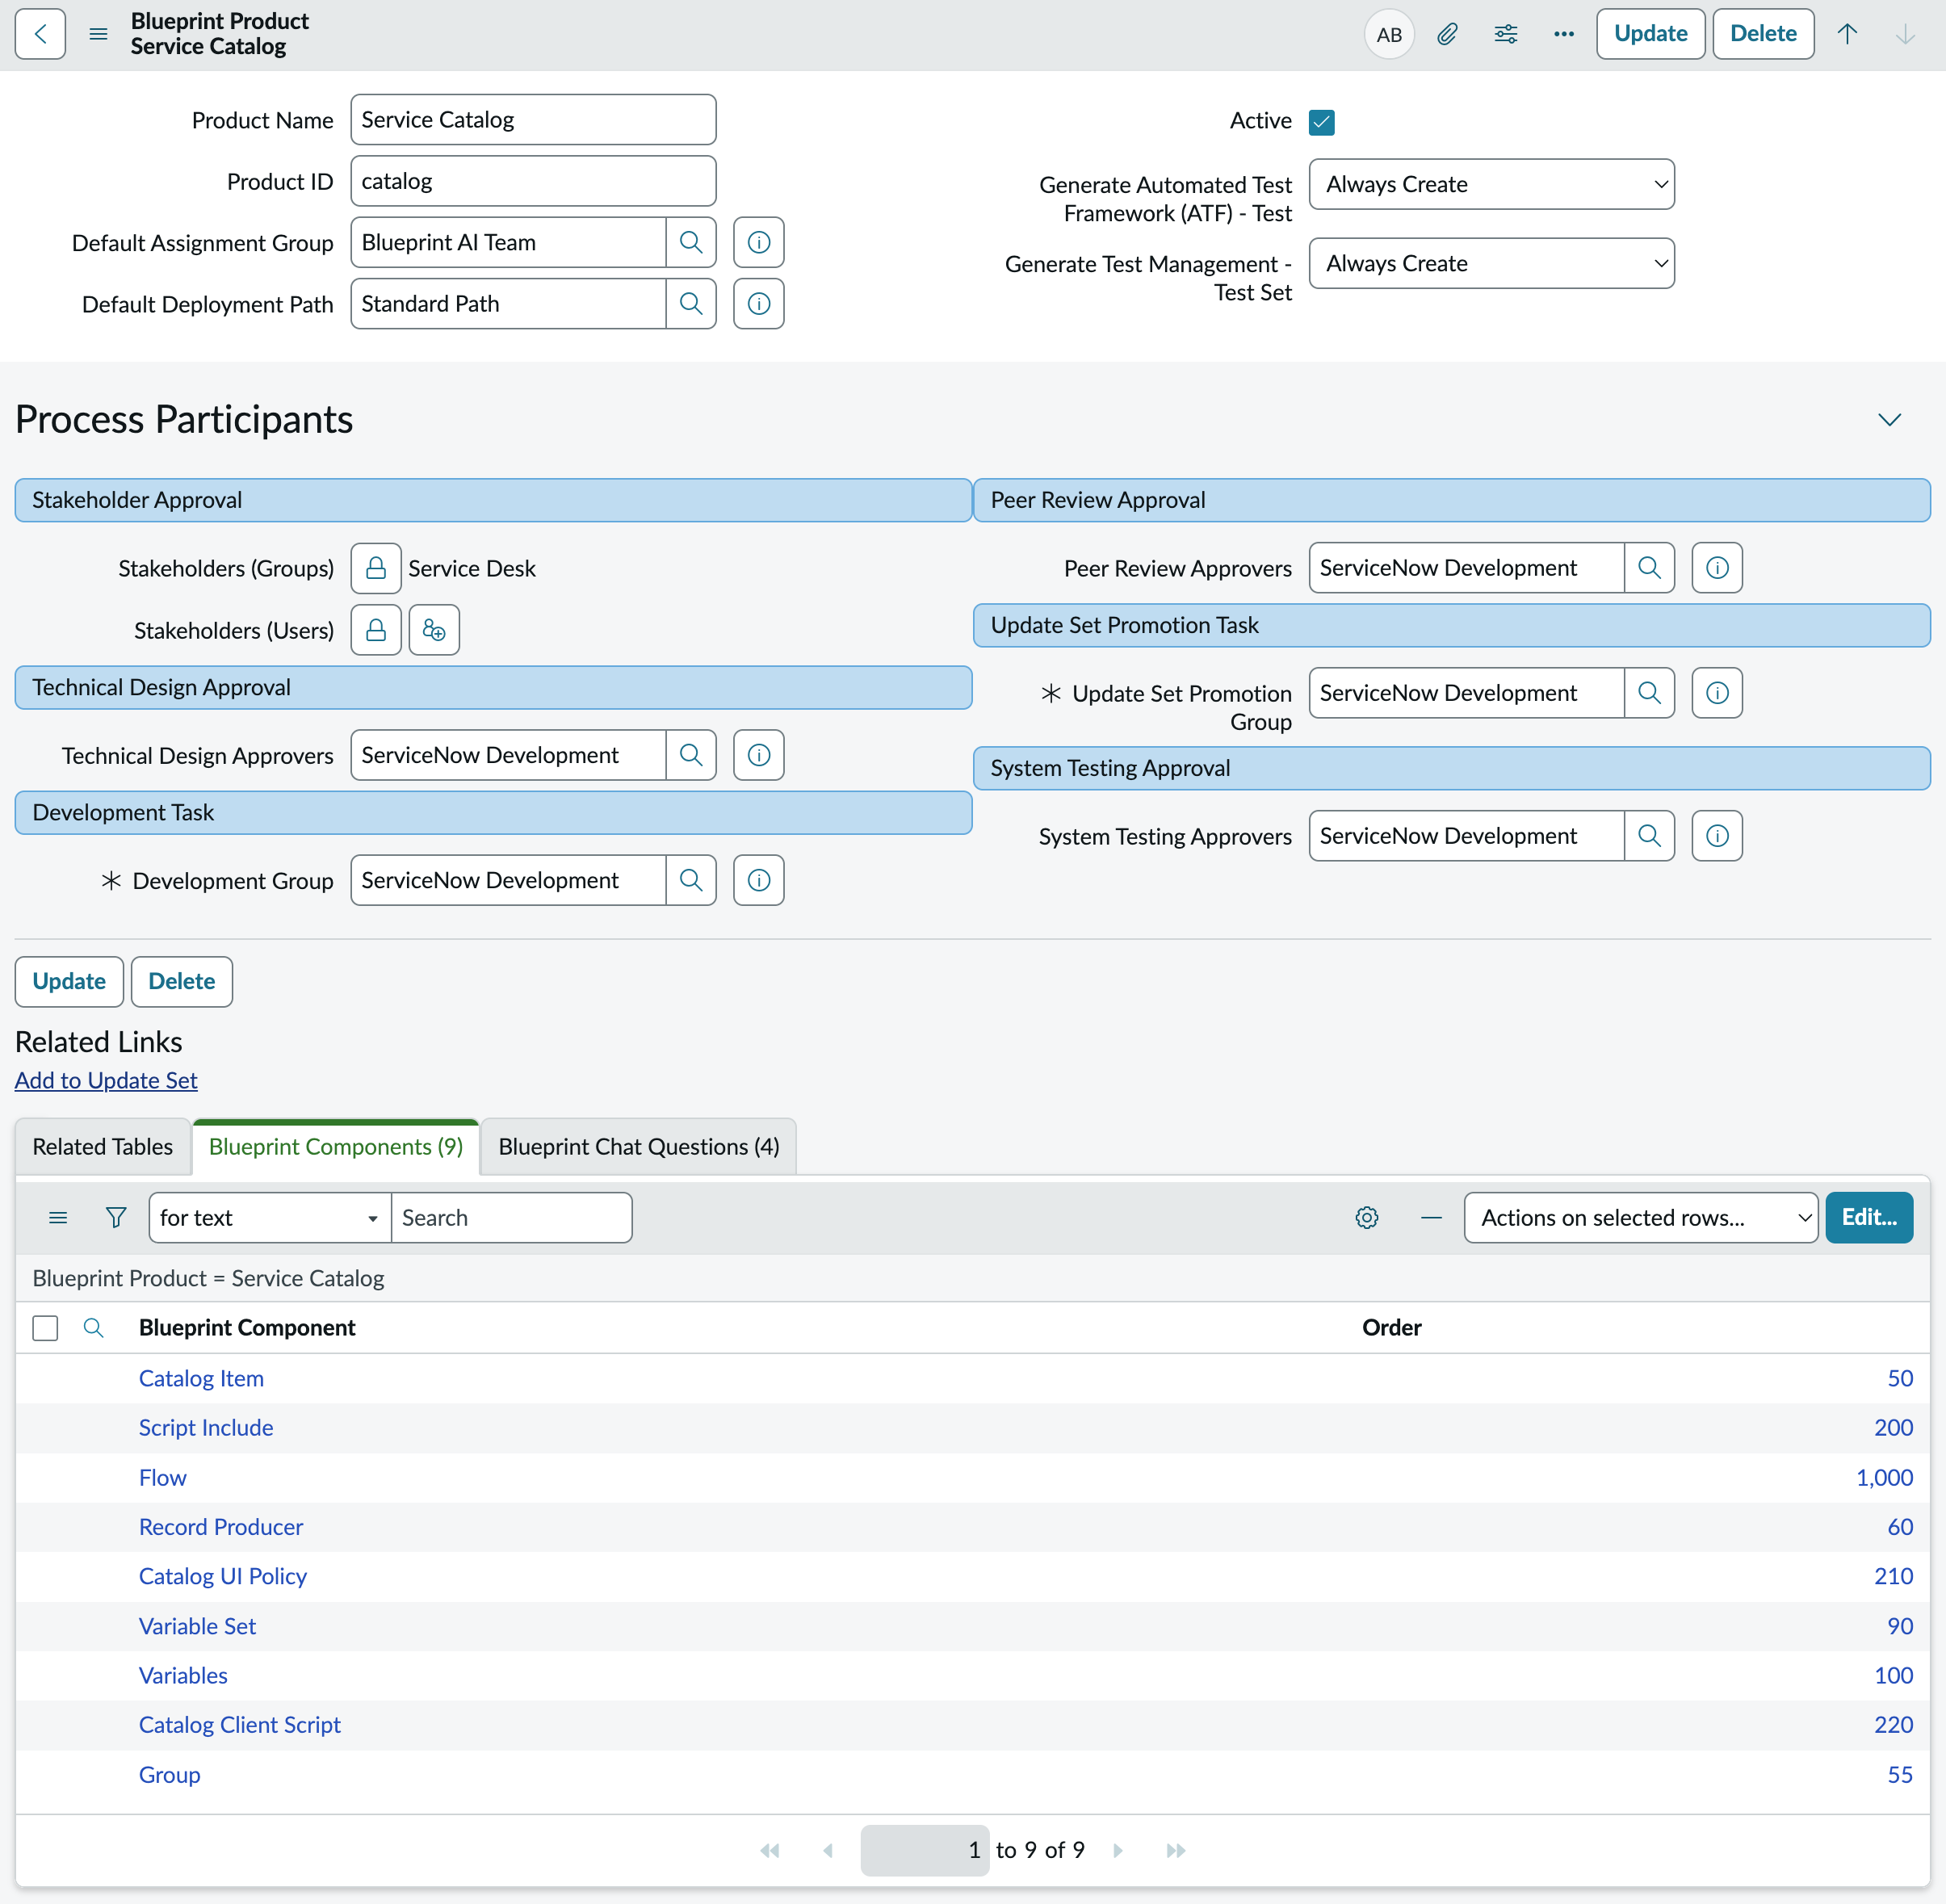
3. Set Default Assignment Group to the group responsible for the Blueprint. Members taking task actions need x_blsog_blueprint.user.
4. Set Default Deployment Path after configuring the path described in section 3.4. This defines the intended update-set promotion sequence.
5. Select Generate Automated Test Framework (ATF) Tests when generated automated tests are required. Configure and execute ATF only in non-production (section 3.3).
6. Select Generate Test Management Test Set when Test Management 2.0 test cases are required. Install and configure that application first (section 3.2). Test Management cases and executable ATF tests are distinct outputs.
7. Review process participants, including Development Group for development validation and Update Set Promotion Group for test and production promotion tasks. Assign appropriate groups and users for each required approval.
8. Confirm optional participant fields intentionally left empty: the corresponding optional workflow step can be automatically approved. For task participants, assign x_blsog_blueprint.user; for approvers, assign both x_blsog_blueprint.approver and approver_user.
9. Save each product. Run the setup actions in section 2.1.6 after configuring products, and rerun them when supported applications are installed or activated later.
Figure 5 - Blueprint Products list.
4.0.0 Product And Reference-Data Review
After completing the installation and setup steps above, review the supported Products in your installed release. Activate only the relevant products and confirm the underlying ServiceNow applications and entitlements. Review each product's related tables, available components, participants, deployment path, and testing settings.
Refresh product-related tables and reference-data access after adding supported applications or changing related-table configuration. Validate the selected source instance and confirm that the integration account can read the specific records needed for an update. Product support does not grant a ServiceNow license or bypass access controls.
Prepare Scoped Applications
For a new scoped application, specify its intended purpose and scope in the requirements. For changes to an existing application, identify the exact application and existing records. Confirm that the target application is supported and available in the selected source environment.
Review generated records and update sets for the intended scope before promotion. Resolve preview problems and review required cross-scope privileges through your normal administrator process; do not automatically allow every request. Scope-aware generation does not replace ServiceNow security or update-set preview review.
Configure Custom Data Components
Custom Data support applies to configured tables and components, not arbitrary unrestricted database writes. Verify the intended table, supported fields, reference context, and permissions in the product/component configuration before requesting record creation or updates.
Identify existing records unambiguously. Review generated records and their relationships in the update set. Missing or ambiguous references require correction and review before promotion. Keep secrets and sensitive customer data out of example requirements.
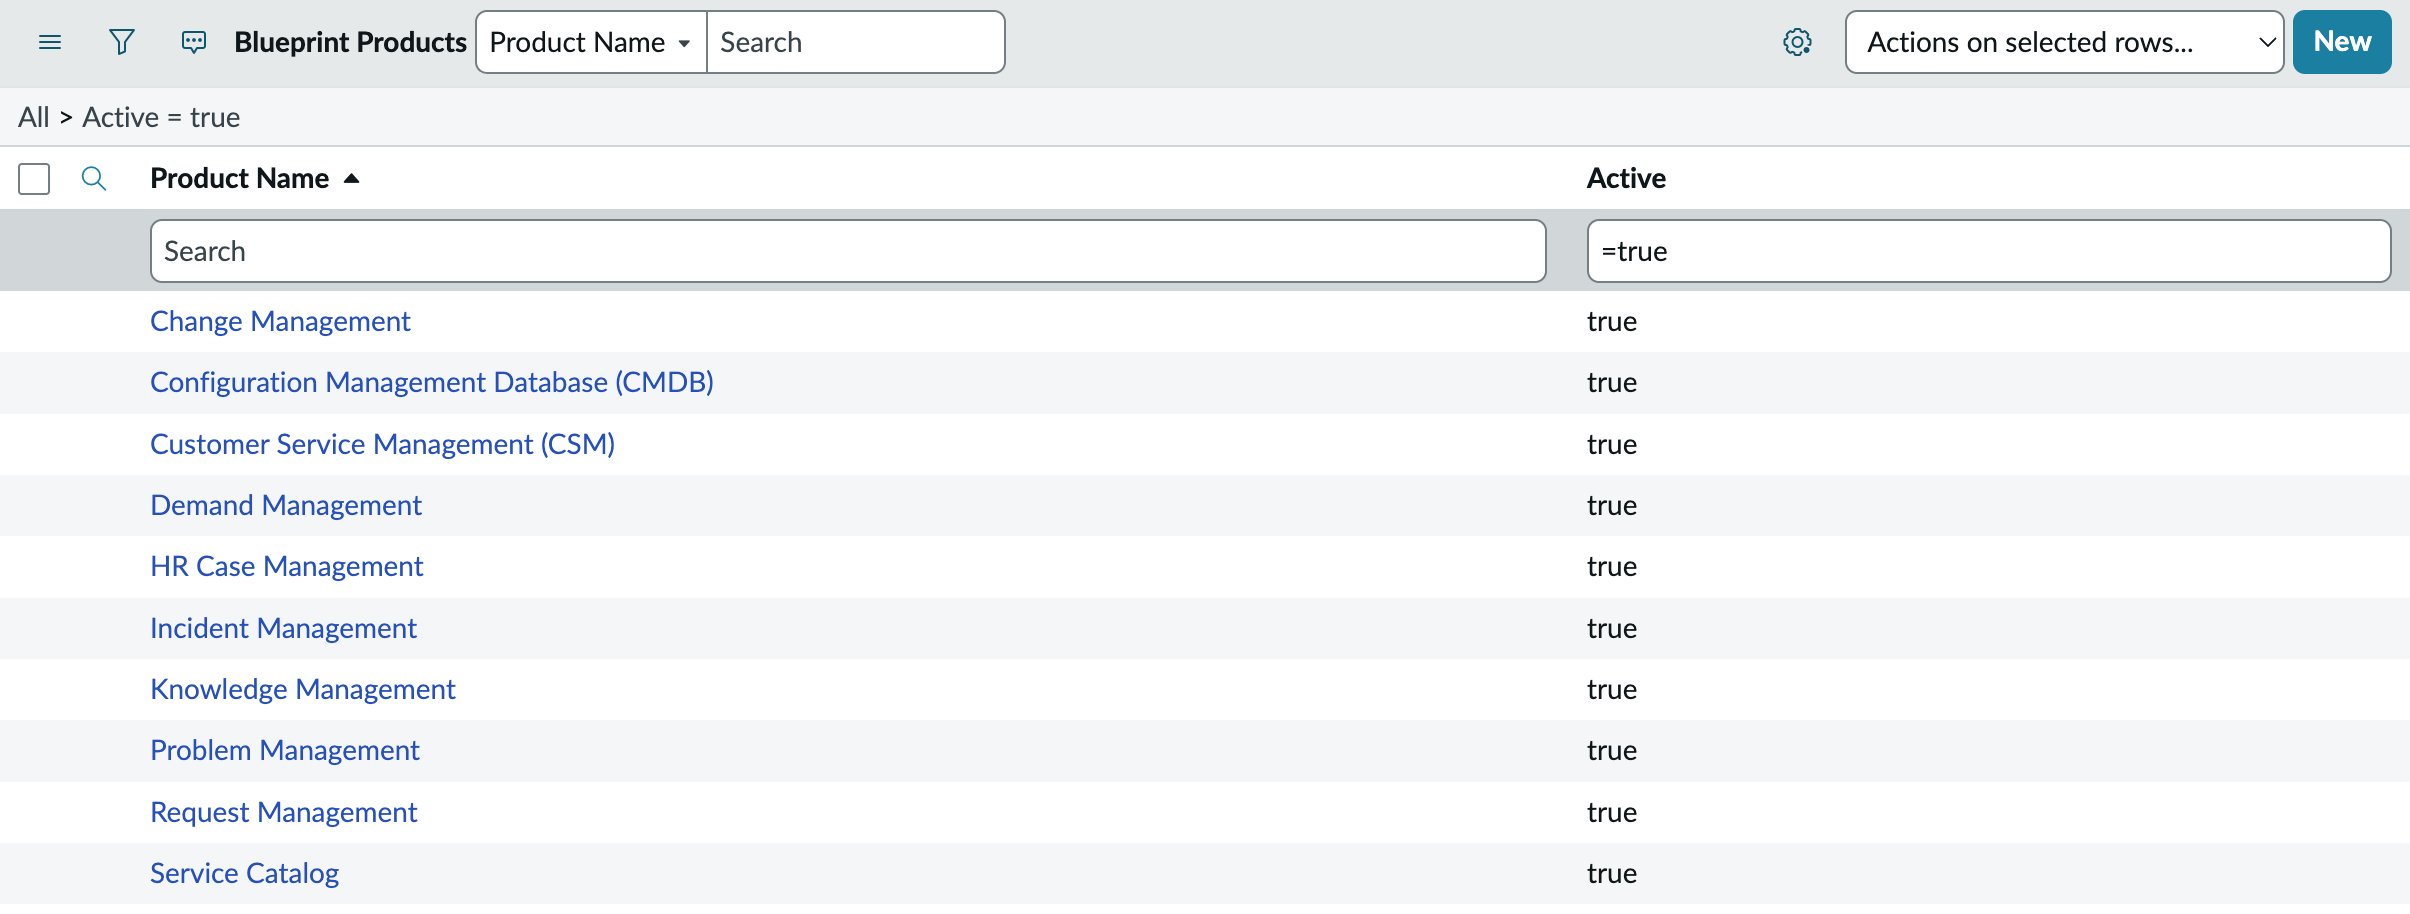
Figure 6 - Product defaults, test generation, and process participants.
2.1.5 Configure ServiceNow Instance Records
Blueprint AI is designed to be self-contained within a single instance and uses the context of the instance it is installed on to develop update sets. However, if development needs to occur using the context of another instance—such as Development, Test, or Sandbox—instance records can be used to facilitate communication between Blueprint AI in Production and those external instances. This feature is especially useful for partners who need to manage and coordinate development across multiple client environments from a central Blueprint AI instance.
2.1.5.1 Mandatory Instance Record
Create the record for the central Production instance. Credentials for production deployment are needed only when automated update-set deployment to that instance is intended and approved.
1. Open All > Blueprint AI > Administration > ServiceNow Instances and select New.
2. Enter the exact instance name from its ServiceNow URL, preserving case. For https://example.service-now.com, the name is example. Select Production as Type and mark the record Active.
3. If production deployment will be used, have the target-instance administrator create a dedicated, approved machine/integration account with the release-documented sn_cicd.sys_ci_automation role. Use Identity type: Machine, or Web service access only on ServiceNow releases before Zurich, and Internal Integration User as applicable.
4. Enter that account in the Deployment User ID and Password fields. Do not use a personal account, share a lookup account for deployment, or place credentials in the Blueprint requirements.
5. Save and run Validate Connection. Resolve connection or authorization failures before activating production promotion. Creation of an instance record does not itself approve a production deployment.
2.1.5.2 Optional Instance Records
Repeat this configuration for each Development, Test, or Sandbox instance Blueprint AI will access. Configure accounts on the instance they authenticate to, then store their approved connection details on the corresponding Blueprint AI instance record.
1. Request a dedicated Data Lookup account for reading the target instance's configuration and metadata. The versioned manual specifies admin together with snc_read_only; have the target-instance security owner review this broad read access and the applicable controls before use.
2. If automatic deployment is required, request a separate Deployment account with sn_cicd.sys_ci_automation. Use machine/integration identities rather than personal accounts. Configure Identity type: Machine (or Web service access only before Zurich), Active, and Internal Integration User as appropriate.
3. In the central Blueprint AI instance, open All > Blueprint AI > Administration > ServiceNow Instances and select New.
4. Enter the exact instance name, its environment Type, and Active status. Add the Data Lookup User ID and Password. Add separate Deployment credentials only when that instance will receive automatic update-set deployments.
5. Save and run Validate Connection (Figure 7). Check the instance name, account status, target roles, and network access if validation fails. Revalidate after credential changes.
6. Return to the ServiceNow Instances list (Figure 8). Verify every source and target instance required by your deployment path before configuring promotion order.
Figure 7 - ServiceNow instance connections. Lookup and deployment credentials serve different purposes.
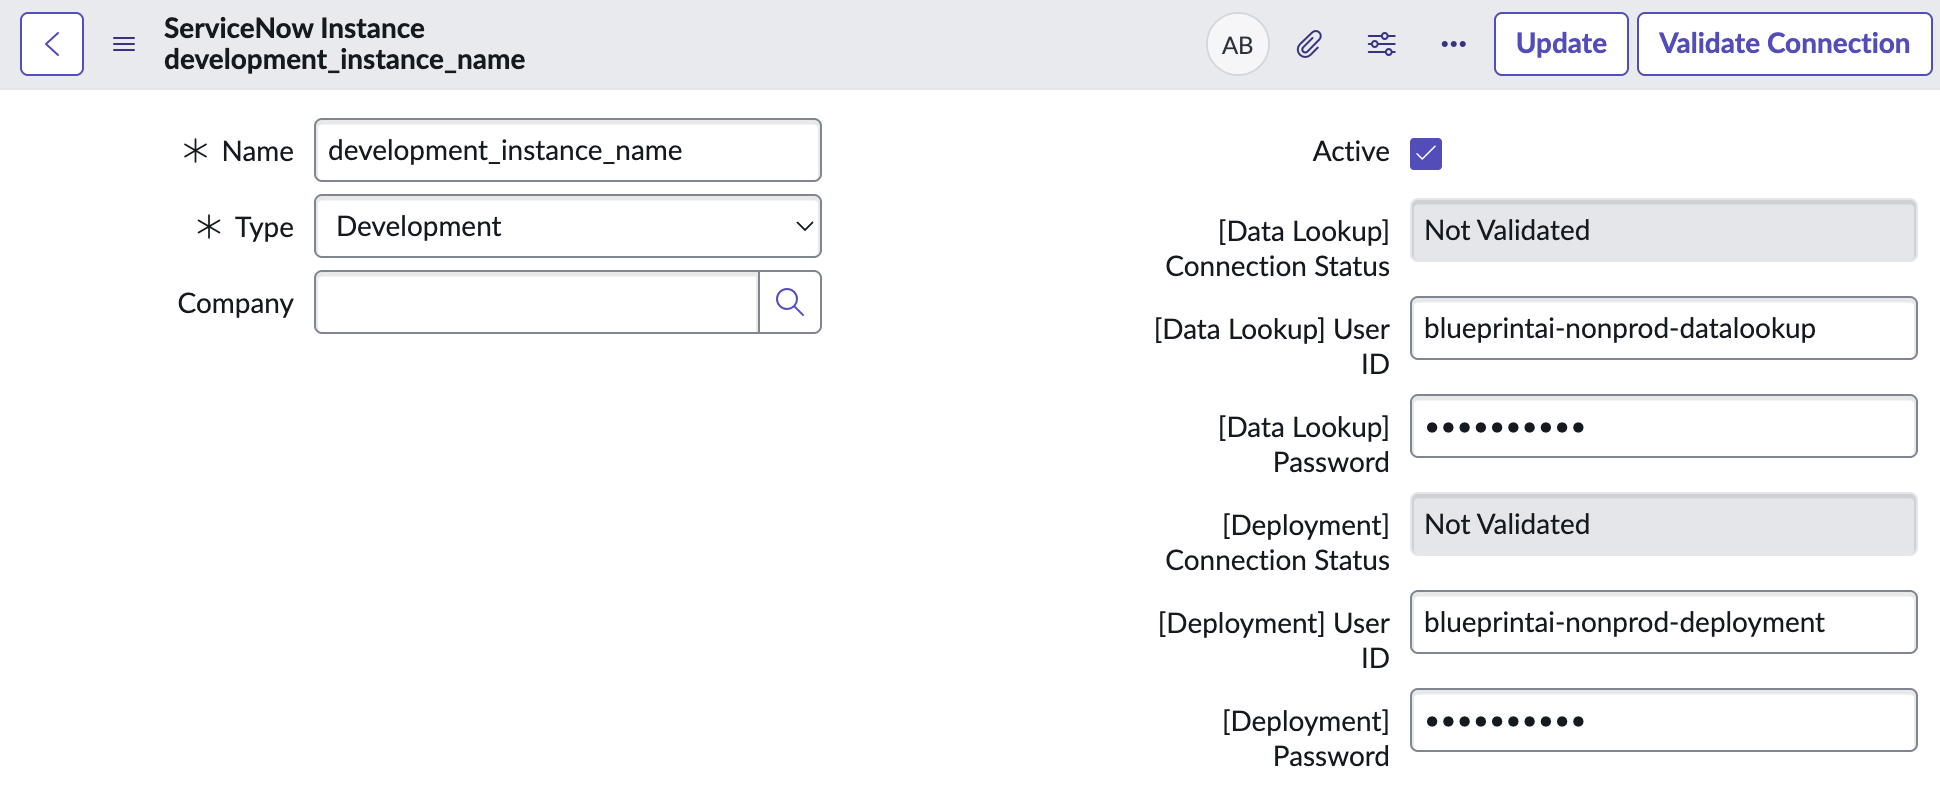
Figure 8

2.1.6 Run Setup Actions
Full setup prepares product-related tables, approved reference-data access, and the prompts used for generation. Complete product configuration, instance connections, and deployment-path settings before marking setup complete.
1. Sign in as a Blueprint AI administrator and select the Blueprint AI application scope.
2. Open All > Blueprint AI > Administration > Blueprint AI Setup.
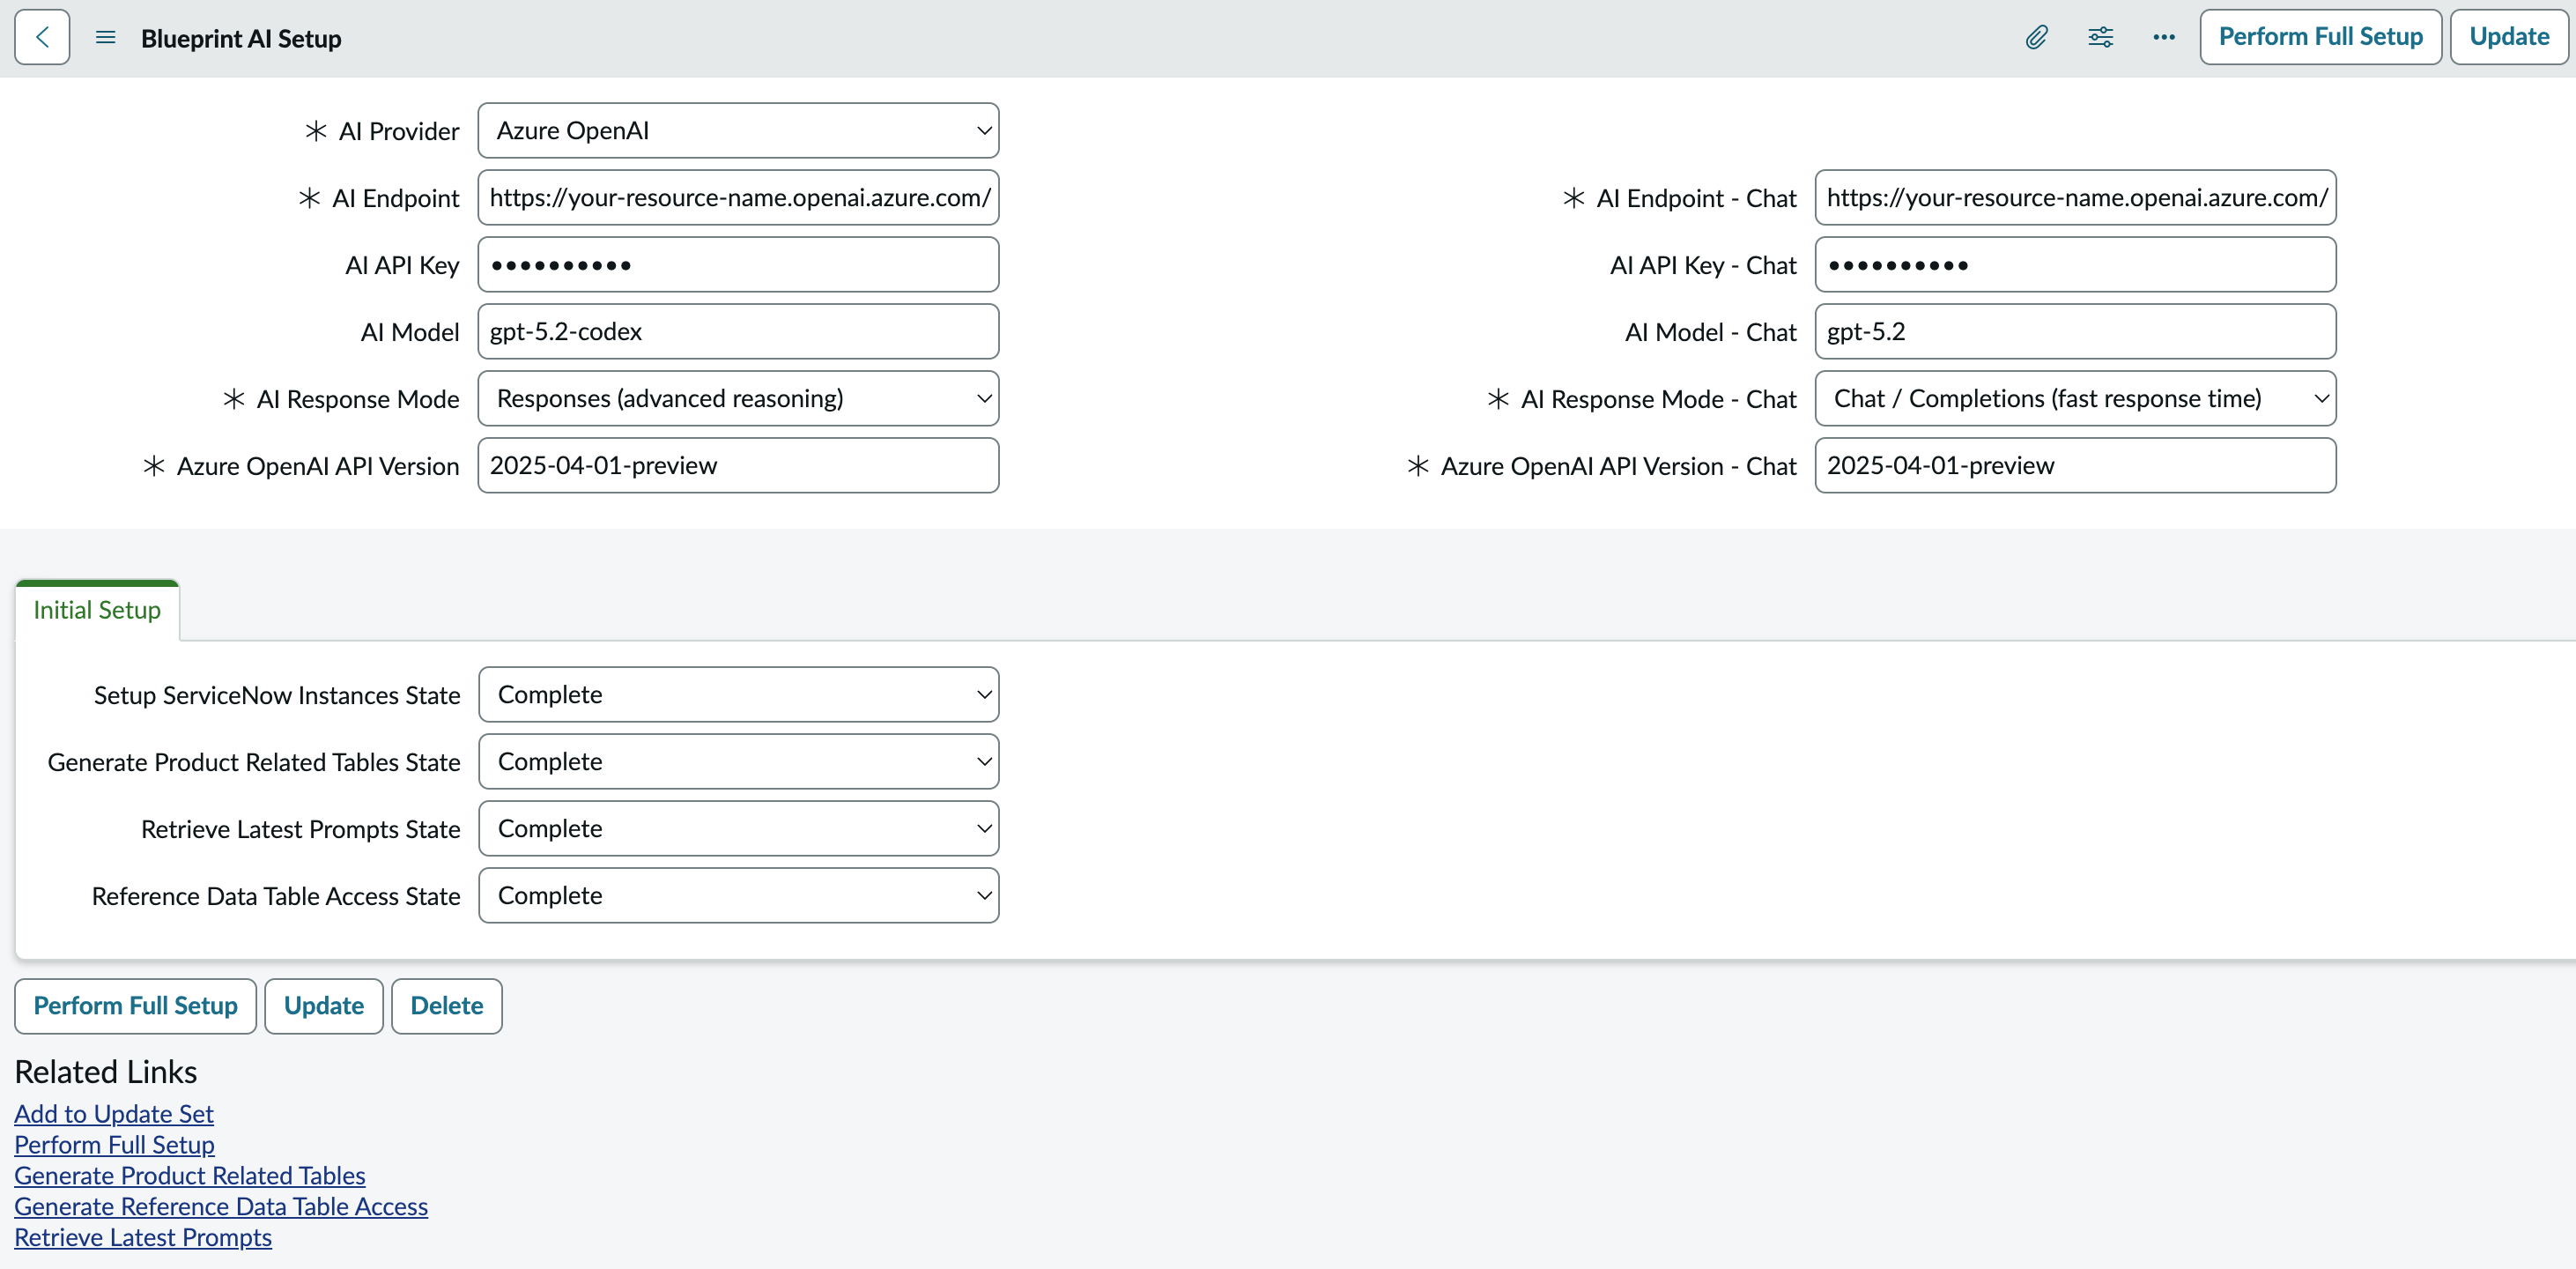
3. Set Setup ServiceNow Instances State to Complete only after the required connections have been configured and validated. Save.
4. Select Perform Full Setup and wait for processing to finish. Completion time depends on the configured products and environment; do not assume that closing the form means setup succeeded.
5. Review the completion states. Generate Product Related Tables identifies the tables associated with configured products. Generate Reference Data Table Access establishes the reference-data baseline. Retrieve Latest Prompts refreshes Blueprint Solutions' supported generation prompts.
6. Investigate incomplete or failed actions before starting generation. Rerun setup when supported applications are installed or activated later, and review prompt retrieval after an upgrade or patch.
Figure 9 - Blueprint AI Setup action states.
2.1.7 Verify Group Approval Access
Blueprint participants need appropriate access to their Group Approvals (sysapproval_group) records. Have a security administrator verify the Blueprint AI application ACLs and test access with representative participant and non-participant accounts.
1. With approved security_admin access, select the Blueprint AI scope and open System Security > Access Control (ACL).
2. Filter Name to sysapproval_group and Application to Blueprint AI (Figure 10). Review the supplied rules and their intended roles and conditions.
3. If a supplied rule is inactive and required for your configuration, review it through your security change process before activation. Do not deactivate restrictive rules or grant broad access merely to clear an approval error.
4. Verify that intended participants can review the required records and unrelated users cannot. Remove elevated privileges when the approved configuration work is finished.
Figure 10 - Blueprint AI Group Approval ACLs.

2.1.8 Retrieve Latest Prompts
Prompt retrieval is included in Perform Full Setup. Use the release-supported setup action to refresh the prompts maintained by Blueprint Solutions after configuration, upgrades, or patches.
1. Open All > Blueprint AI > Administration > Blueprint AI Setup and review the prompt retrieval state.
2. Run the appropriate setup action, wait for completion, and investigate errors before testing generation. Some installations also expose Retrieve Latest Prompts as a Related Link on the Feedback list, shown in Figure 11.
3. Validate a representative Blueprint after a prompt refresh. Preserve your organization-specific configuration and do not assume a prompt download alone upgrades the application.
Figure 11 - Retrieve Latest Prompts Related Link on Feedback (alternate entry point where available).

3. Additional Configuration
3.1 Blueprint Approvals in Other Portals
If users access approvals through other ServiceNow portals—such as the Service Portal or Employee Service Center (ESC)—they may encounter Blueprint AI approval records that they are not authorized to view or act upon. This can lead to confusion or an inability to complete the approval process as intended.
To ensure that Blueprint AI approval records are only reviewed and actioned within the Blueprint AI Portal, ServiceNow administrators should implement a filter on the sysapproval_approver records displayed in other portals. This filter should exclude Blueprint-related approvals by leveraging conditions based on record type, table, or other identifying attributes unique to Blueprint AI.
By isolating Blueprint approvals to the designated portal, you maintain a clear separation of responsibilities, reduce approval errors, and provide a streamlined experience for both approvers and requesters.
3.2 Enable Test Management 2.0 Integration
Blueprint AI includes optional support for Test Management 2.0, allowing users to automatically generate test cases alongside requirements, technical designs, and solutions. This integration enables platform teams to accelerate quality assurance efforts by embedding test coverage into the development lifecycle.
Notes:
-
This step is only necessary if your organization is using or desires to use Test Management 2.0 within your ServiceNow instance.
-
Test Management 2.0 may require an additional license depending on your ServiceNow subscription. Please consult your ServiceNow account representative or review your current entitlements to confirm access before installing or enabling this application.
3.2.1 Install Test Management 2.0
1. Login as a user with the “admin” role to the ServiceNow Production instance
2. Navigate to System Applications > All Available Applications > All [Figure 1]
3. Search for “Test Management 2.0”
4. Click the “Install” button
Notes:
-
The ServiceNow progress bar may appear to be stuck or remain at the same percentage for several minutes. If this happens, please continue to wait.
-
You can choose to “Run in Background” if you prefer to perform other tasks while the installation is in progress.
5. Once the install is finished, click the “Close” button
6. To ensure the application has been installed, refresh the browser and search for “Test Management 2.0” in the application navigator. [Figure 12]
Figure 12

3.2.2 Enable Test Generation for the Product
1. Confirm Test Management 2.0 is installed and available under your ServiceNow entitlement.
2. Open All > Blueprint AI > Administration > Products and select the applicable product.
3. Enable Generate Test Management Test Set and save. Review the generated cases against the approved requirements and record test outcomes through your team's testing process.
4. Keep this setting separate from Generate Automated Test Framework (ATF) Tests. Manual test cases and executable ATF tests cover different validation needs.
Figure 13 - Product test-generation options. Select the required output for each active product.
3.3 Automated Test Framework (ATF)
Blueprint AI can generate ATF tests for its generated update sets. Test generation is not proof that the solution passes, and an ATF result does not replace design, security, or deployment review.
1. On the relevant Blueprint Product, enable Generate Automated Test Framework (ATF) Tests.
2. Prepare a development, test, or other non-production instance for execution. If ATF execution is disabled there, an authorized administrator can review System Properties > Automated Test Framework and the sn_atf.runner.enabled setting.
3. Review the generated tests, test data, assertions, and any required users or environment dependencies. Execute only in non-production. Do not enable or run ATF tests in Production.
4. Inspect failed steps and logs, determine whether the failure is in the generated solution, test assumptions, permissions, or environment, and resolve it before promotion. Retest the affected behavior and retain the results.
3.4 Deployment Paths and Promotion
Deployment paths define which environments receive the update set, in what order, and at which Blueprint state. A typical governed sequence is Development, then Test, then Production. Configure and validate every instance connection first.
1. Open All > Blueprint AI > Administration > Deployment Path, select New, enter a descriptive Name, and save. A path can be activated only after it has at least one Deployment Path Instance.
2. Open the path and add a record under Deployment Path Instances. Set Target Instance to Development for the first step and Blueprint State to Development.
3. For the first step, set Update Set Source to Blueprint. This uses the update set attached to the originating Blueprint record.
4. Add the next target, such as Test, with the appropriate Blueprint State (Promote to Test). Set Update Set Source to Retrieve from Instance and Source Instance for Update Set to the previous successfully deployed environment.
5. Add the Production step with Blueprint State set to Promote to Production. Select the preceding environment as the update-set source and configure any required Change-Based Promotion Condition and Change Deployment Window.
6. Set Promotion Order for every step; lower numbers run first. Save each record, inspect the full sequence, and activate the path when ready. Assign it as the product's Default Deployment Path.
7. During use, review the generated update set and complete development validation before proceeding. Preview and resolve target conflicts through your approved process. Verify testing, required approvals, source instance, and change conditions before each promotion.
If promotion waits or fails, inspect the Blueprint state, path activation, promotion order, previous deployment, instance connection, and any pending change conditions. Do not bypass a failed gate by removing its approval requirement.
3.5 Change Management Automation
Open the Deployment Path and choose how Change Requests are handled. Disabled means Blueprint AI does not create or manage a change for this path. Automatic creates and associates a change when the configured conditions are met. Manual lets your team create and associate the change used to govern promotion.
1. For Automatic, configure Change Request is created when and Set these values on the Change Request. Use field values that form a valid change record under your organization's process, including any required fields.
2. On each applicable Deployment Path Instance, configure the Change-Based Promotion Condition. For the Production step, select the permitted Change Deployment Window: immediately when conditions are met, between Planned start and end dates, or between Actual start and end dates.
3. Test the configuration with an approved non-production example. Confirm the correct change is associated, pending or declined approvals block the intended step, and promotion outside a configured window does not proceed.
4. Before production deployment, confirm the linked change, approval status, dates, and target environment. Automatic creation is not automatic organizational approval.
3.6 Working Through a Blueprint
1. Create a Blueprint with a clear objective, the correct product and source-instance context, and identifiable existing records. Describe desired behavior, constraints, acceptance criteria, and what must remain unchanged.
2. Refine business requirements through the available conversation and review workflow. Resolve ambiguity before submitting for approval. Return the Blueprint to the appropriate editable stage when an approved item needs revision.
3. Review the generated technical design, selected components, assumptions, and references before approving development. Confirm the work is appropriate for the intended environment.
4. Review generated components and the update set. Complete development validation, run the selected testing outputs in the proper environment, and resolve defects before promotion.
5. Follow the configured deployment path and change process. Retain validation results and check the deployed behavior at each environment, rather than treating generation as deployment success.
Define The Target Before Generation
Select the product and source instance. State whether the request creates something new or changes an existing record, and identify the exact application, table, record, and desired behavior. Review the generated requirements and technical design before approving development. Keep generated changes inside the intended application scope.
Example: Extend An Existing Scoped Application
Ask for a supported field and form change on a named table in an existing custom application. Identify the view, field placement, and expected behavior. Review the design's create-versus-update decisions, then inspect the generated dictionary, form, script, and application-scope values in development. Review cross-scope requests and preview issues before promotion.
Example: Create Configured Custom Data
For a configured custom table, describe the record to create and its required relationship to an existing record. Provide a unique record name or other approved identifier instead of a vague description. Confirm that the referenced record is available from the selected source instance. Inspect the generated data and relationship values before promoting the update set.
Example: Update A Catalog Experience
Name the existing Catalog Item and Catalog Category when requesting an update. Describe variables, existing variable sets, field order, and layout requirements explicitly. Review the chosen target records and the generated variable configuration. Test the catalog experience in a non-production instance, including validation and visibility behavior.
Example: Update A Form And Related Lists
Specify the table and view, the intended field order, and the related lists that should appear below the form. Distinguish creating a new field from showing or hiding an existing field. Compare the generated layout with the requirements and check that related lists use the correct relationships.
Flows, Scripts, And References
Use supported Flow types and available actions. Identify an existing Flow precisely when requesting an update and avoid concurrent builds targeting the same Flow name. Review generated scripts in their actual scoped or global execution context. Targeted reference gathering improves focus, but still requires accurate source selection and sufficient access.
Validate And Promote
Review the full update set, not only the generated summary. Confirm the intended records and scope, resolve preview problems, execute applicable tests in non-production, and inspect results. Then follow the configured deployment path, participant approvals, Change Request conditions, and deployment window.
Further Guidance
Consult the site's Tips and Tricks page for shared requirement-writing guidance. For interrupted processing, inspect and correct the underlying error before using retry/resume, then review the resumed work for completeness.
3.7 Upgrade and Troubleshooting Checklist
Before upgrading, record the installed version and preserve your approved configuration and recovery arrangements. Validate the upgrade in a representative non-production environment before changing the production application.
After upgrading, review roles, provider/model settings, instance connections, products, process participants, deployment paths, and Change Request rules. Run the supported setup and prompt-retrieval actions, then test requirements, design, generation, validation, ATF or Test Management output, and the intended promotion gates.
For failed generation, capture the Blueprint identifier, version, stage, timestamp, and sanitized error. Check provider access, response configuration, connectivity, and source-data permissions. Use the available retry or recovery action only after resolving the cause; inspect existing outputs before regenerating work.
For missing reference data, check the selected source instance, supported product and table configuration, and reference-data setup. For approval failures, check participant roles and task-group membership. For deployment failures, check the ordered path and instance credentials before changing workflow rules.
Share reproducible steps and sanitized evidence with support. Exclude API keys, passwords, personal records, raw customer data, and unredacted request logs.
Upgrade Validation For 4.0.0
Preserve existing AI connectivity, users, instance records, products, deployment paths, change rules, and testing settings. Complete the applicable setup actions after the application upgrade and review the latest approved prompts.
Validate representative supported scenarios in non-production: an existing scoped record update, a configured Custom Data record, a catalog change, a form layout with related lists, and a supported Flow. Confirm record identity, application scope, variables, references, generated scripts, update-set contents, and test results.
Recover Interrupted Processing
Inspect the failed Blueprint activity and AI/API error before retrying. Correct the underlying provider, connection, model, access, or request issue. Use the available retry/resume action and review the resumed result for completeness and duplicate records. Retry is not a substitute for technical review or successful testing.
4. Appendices - Glossary of Terms
Overview
Blueprint AI 4.0.0 expands the range of ServiceNow solutions that teams can create and update. The release adds scoped-application and configured Custom Data support, improves catalog and form generation, and strengthens reference gathering and recovery.
Expanded Product Support
An expanded list of supported ServiceNow products enables a broader range of platform use cases. Available components depend on the product configuration and the applications installed and licensed in your instance.
Scoped Application Support
Create and update custom scoped applications and supported out-of-box application areas, including related tables, fields, forms, scripts, and other supported components.
Custom Data Components
Create and update configured custom data records for implementation-specific needs beyond standard platform objects.
Flow Designer Enhancements
Create and update all supported Flow types with improved reliability, accuracy, and flexibility.
Service Catalog Enhancements
Improved Catalog Item and Catalog Category selection, smarter variable handling, and more natural catalog form layouts.
Form Layouts And Related Lists
Create and update form layouts with improved field organization and consistency. Add and update related lists below forms.
Targeted Reference Data
More targeted supporting-data gathering reduces unnecessary records in AI prompts and improves update accuracy.
Scope-Aware Script Generation
Improved script generation accounts for scoped and global application contexts.
Retry, Resume, And Reliability
Improved recovery helps Blueprints continue after interrupted AI processing. Additional performance, logging, error-handling, and stability improvements support the delivery workflow.